User Settings

If you have a user for an ExaVault account, the settings on the User tab allows you to update how you view and interact with the web application.
To access settings for your user:
1. Log in to your ExaVault account.
2. Click on the My Account (gear icon) option from the left navigation bar.
The page will automatically open the User tab. If you navigate to a different settings page, you can select Preferences from the top navigation to return.
Display Name
Your display name will be the name used across the ExaVault web application. For example:
- In the Sessions Log, your display name will be listed next to activities you perform.
- On the Users page, your display name is listed next to your username to help manage.
- Email notifications about account actions will include your display name as well.
Email Address
Your email address is used for recovering your password and for receiving notifications or invites for your user from ExaVault. To update your email address:
1. Click the Change link next to your current email address.
2. Enter the new email address in the pop-up that appears.
3. Click the SAVE button on the pop-up.
4. On the Confirm Your Password screen that opens, enter your user password to finalize the update.
You may need to refresh or re-authenticate to see the updated email address listed.
Username / Password
You must have the Password permission enabled for your user to update this setting. If it is not available, contact your account administrator for additional assistance.
This section of the settings page lists the current Username assigned to your user. If you need your username updated, please contact our account administrator for additional assistance.
If your settings page includes the Username / Password section, to update your password:
1. Click the change password link.
2. On the pop-up, enter your current password first.
3. Enter the new password and re-enter to confirm.
4. Click the SAVE button.
Enabling Multi-Factor Authentication
The Multi-Factor Authentication feature is not available in some plans and may require an upgrade to your account.
All users have the option to provide their account additional security by individually enabling the Multi-Factor Authentication (MFA). When enabled, every time you attempt to connect to your ExaVault storage, you will be required to enter a 6-digit number to confirm your identity by the method selected.
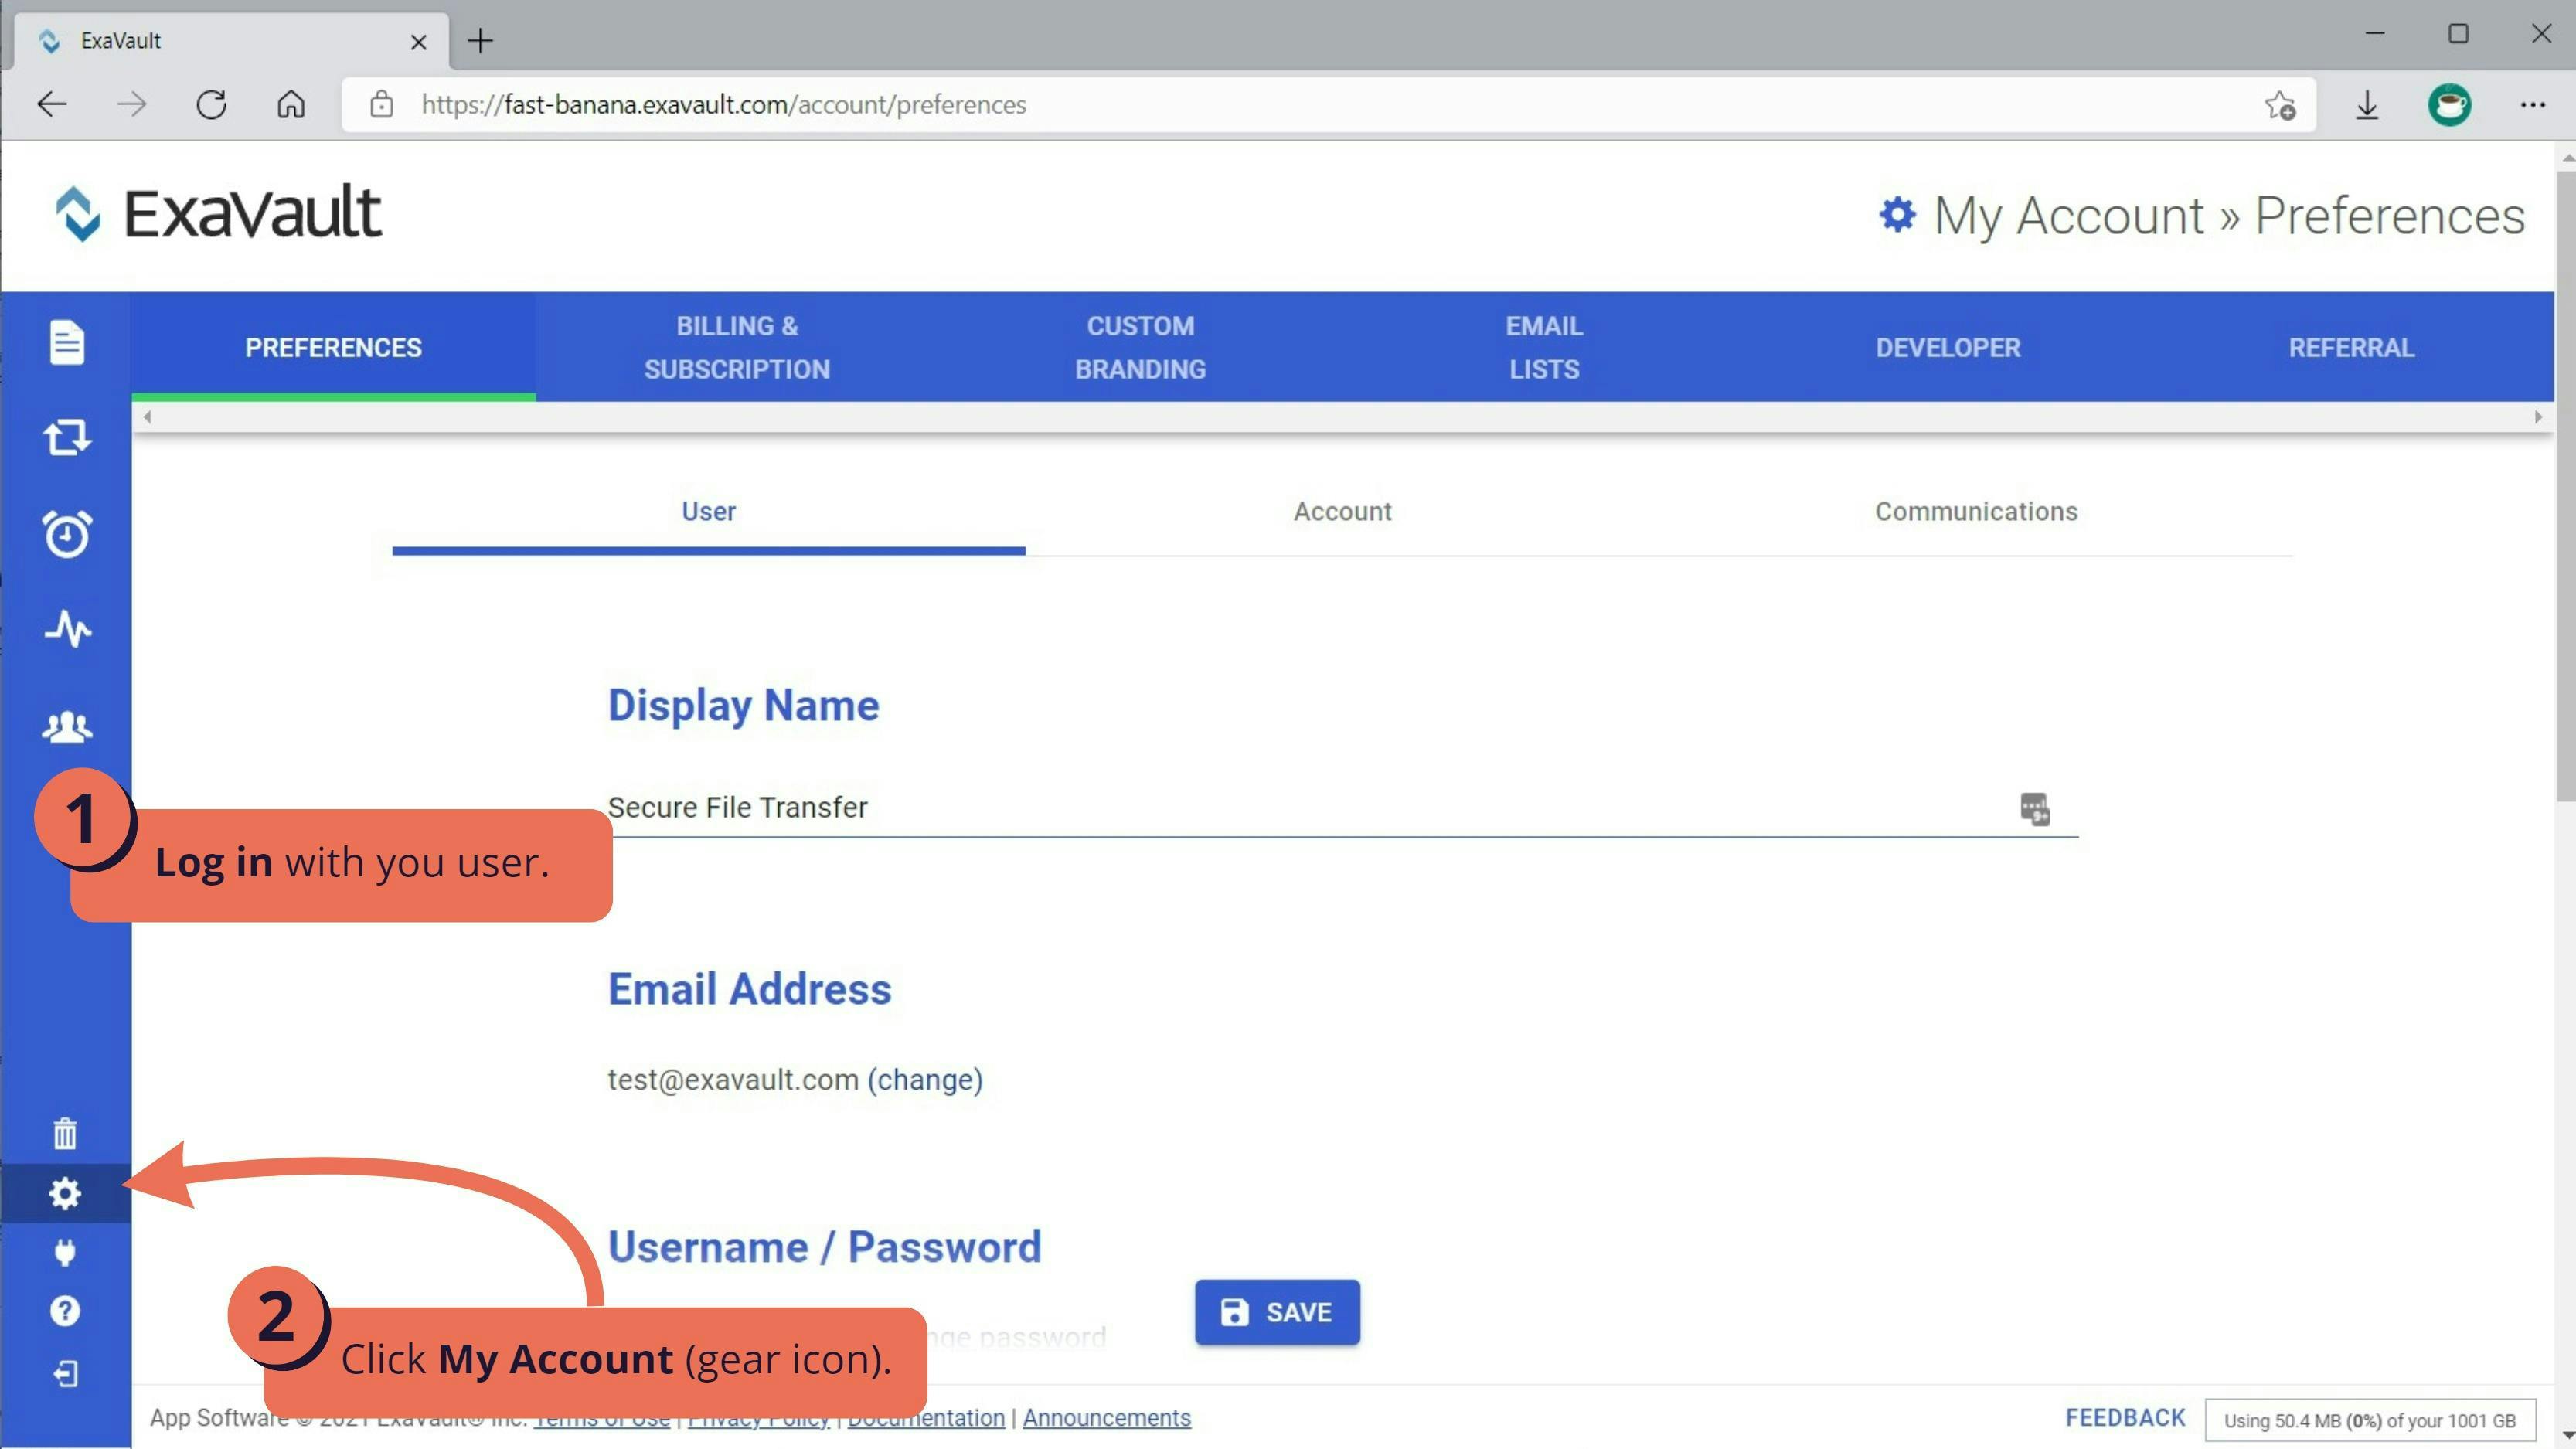
1. Log in to your account.
2. Click the My Account (gear icon) on the left navigation bar.
3. On the User page, scroll down to Multi-Factor Authentication(MFA) and click the SET-UP MULTIFACTOR AUTHENTICATION button.
On the pop-up that appears, you will have the following options:
- Application: To use an authenticator application, you will need to download an application to your phone to generate the 6-digit number when connecting with your account. We recommend Google Authenticator or Authy but any app supporting TOTP protocol will work if you already have an authenticator app.
- SMS: Short Messaging Service (SMS) will send the 6-digit code texted directly to your phone each time you attempt to connect with your account. Select this option if you want to receive texts instead of using an application to manage your authentication options.
The following settings may be restricted by the administrator on your account. If you encounter issues enabling the Multi-Factor Authentication feature for your user due to the settings available, contact your administrator for additional assistance.
MFA Using Application
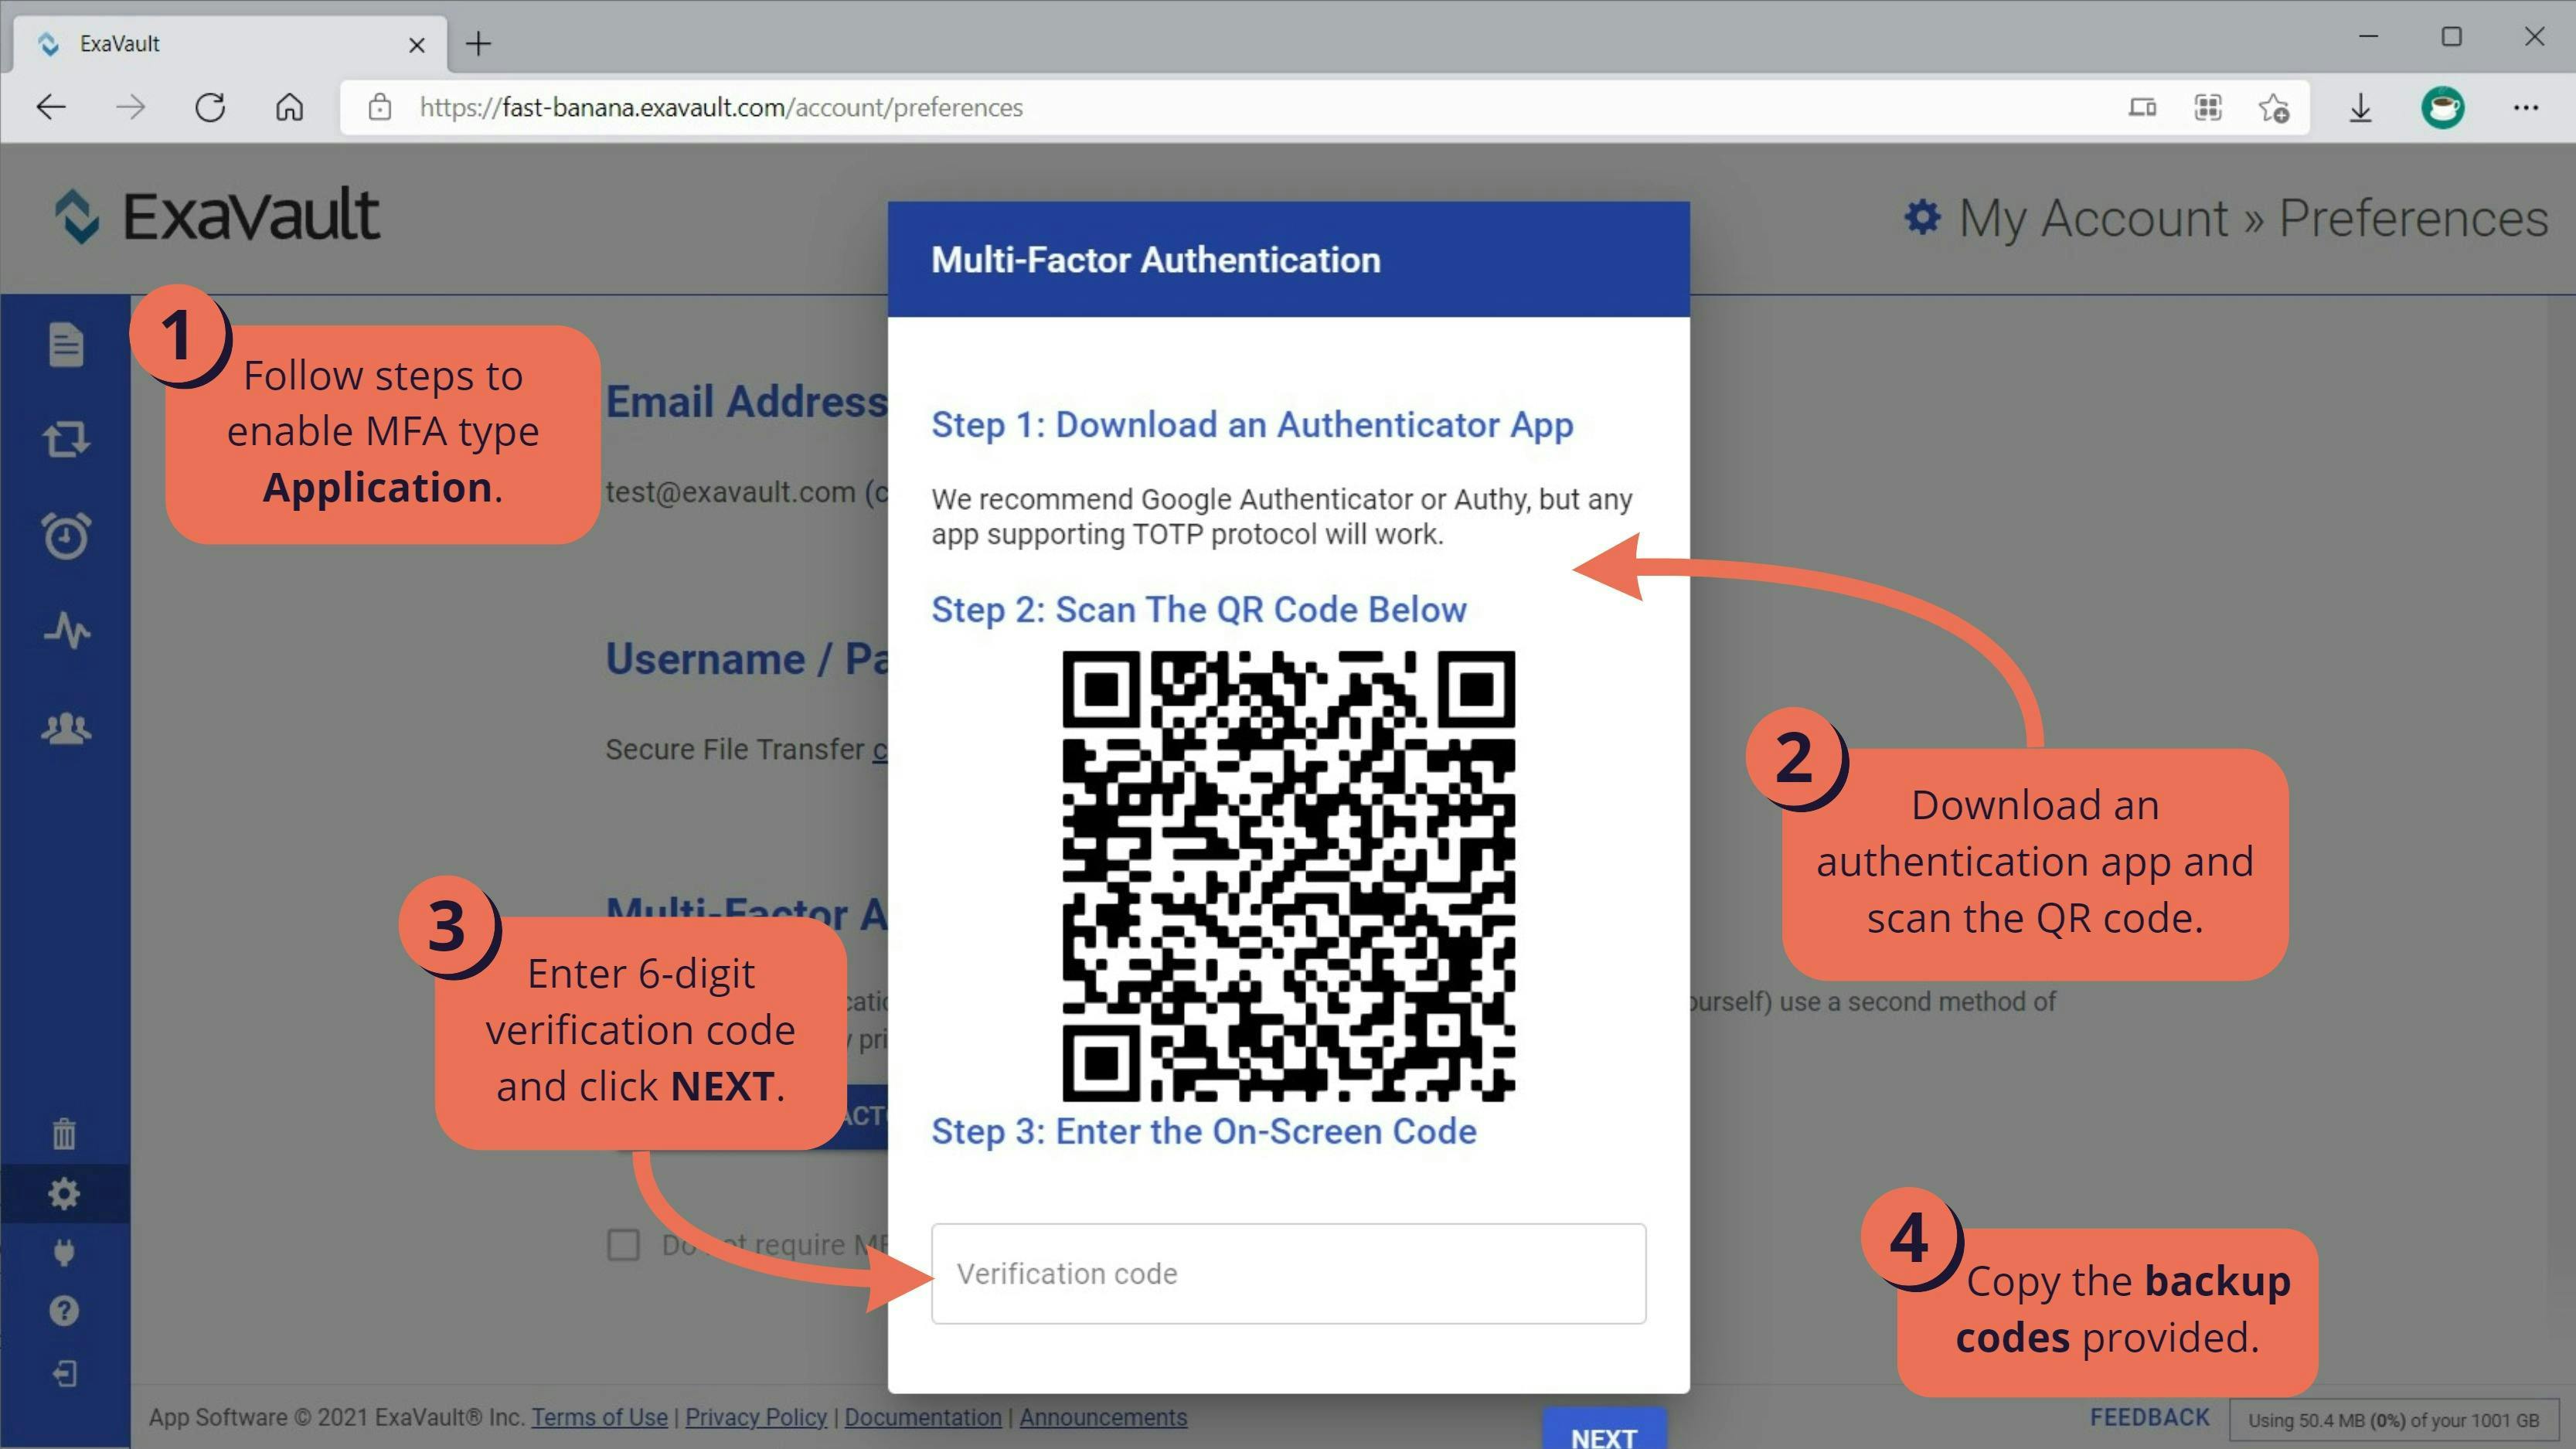
1. After following the steps to enable MFA, select type Application and click the NEXT button.
2. Follow the steps provided provided to download an authentication app and use the downloaded app to scan the QR code provided.
3. Enter the 6-digit verification code shown in your authentication app and click the NEXT button.
- If you are unable to receive your 6-digit code from the downloaded authentication app, click anywhere outside Multi-Factor Authentication pop-up to start over.
4. The screen that appears, copy your backup codes and store them in a safe place.
- If you ever lose your device, the backup codes below will allow you to login to your account to reset your MFA.
- If you misplace your backup codes, you will need to contact an account administrator to reset your MFA for your account before you can access files again.
MFA Using SMS

1. After following the steps to enable MFA, select type SMS and click the NEXT button.
2. Enter your full cell phone number, staring with country code, and click the NEXT button. You can click on the Flag icon to preselect a country code.
3. Once you have received a text with the 6-digit code, enter the number in the Verification code field and click NEXT.
- You have 2 minutes to enter the 6-digit code before it expires. If you are not able to enter the code in time, select RESEND SMS link to receive a new verification code and an additional 2 minutes.
- If you do not receive a text and you believe your number was entered incorrectly, click anywhere outside Multi-Factor Authentication pop-up to start over.
4. The screen that appears, copy your backup codes and store them in a safe place.
- If you ever lose your device, the backup codes below will allow you to login to your account to reset your MFA.
- If you misplace your backup codes, you will need to contact an account administrator to reset your MFA for your account before you can access files again.
MFA with FTP & SFTP Connections
When MFA is enabled for your user, direct connections with your account using an FTP or SFTP will require that you reenter your username and password with the verification code appended to your password in order to authenticate. For example:
- Initial Login: Username (my_user) + Password (pa$$word)
- Authentication Login: Username (my_user) + PasswordVerificationCode (pa$$word123456)
If your username has automation enabled and you do not want to require the second authentication for connections (unless using the web application to connect):
- Create an SSH Key for your username. SSH Keys will bypass MFA when making an SFTP connection.
- Check the Do not require MFA on S/FTP and click SAVE. When enabled, your FTP and SFTP connections will be made without the second authentication step.
Resetting MFA
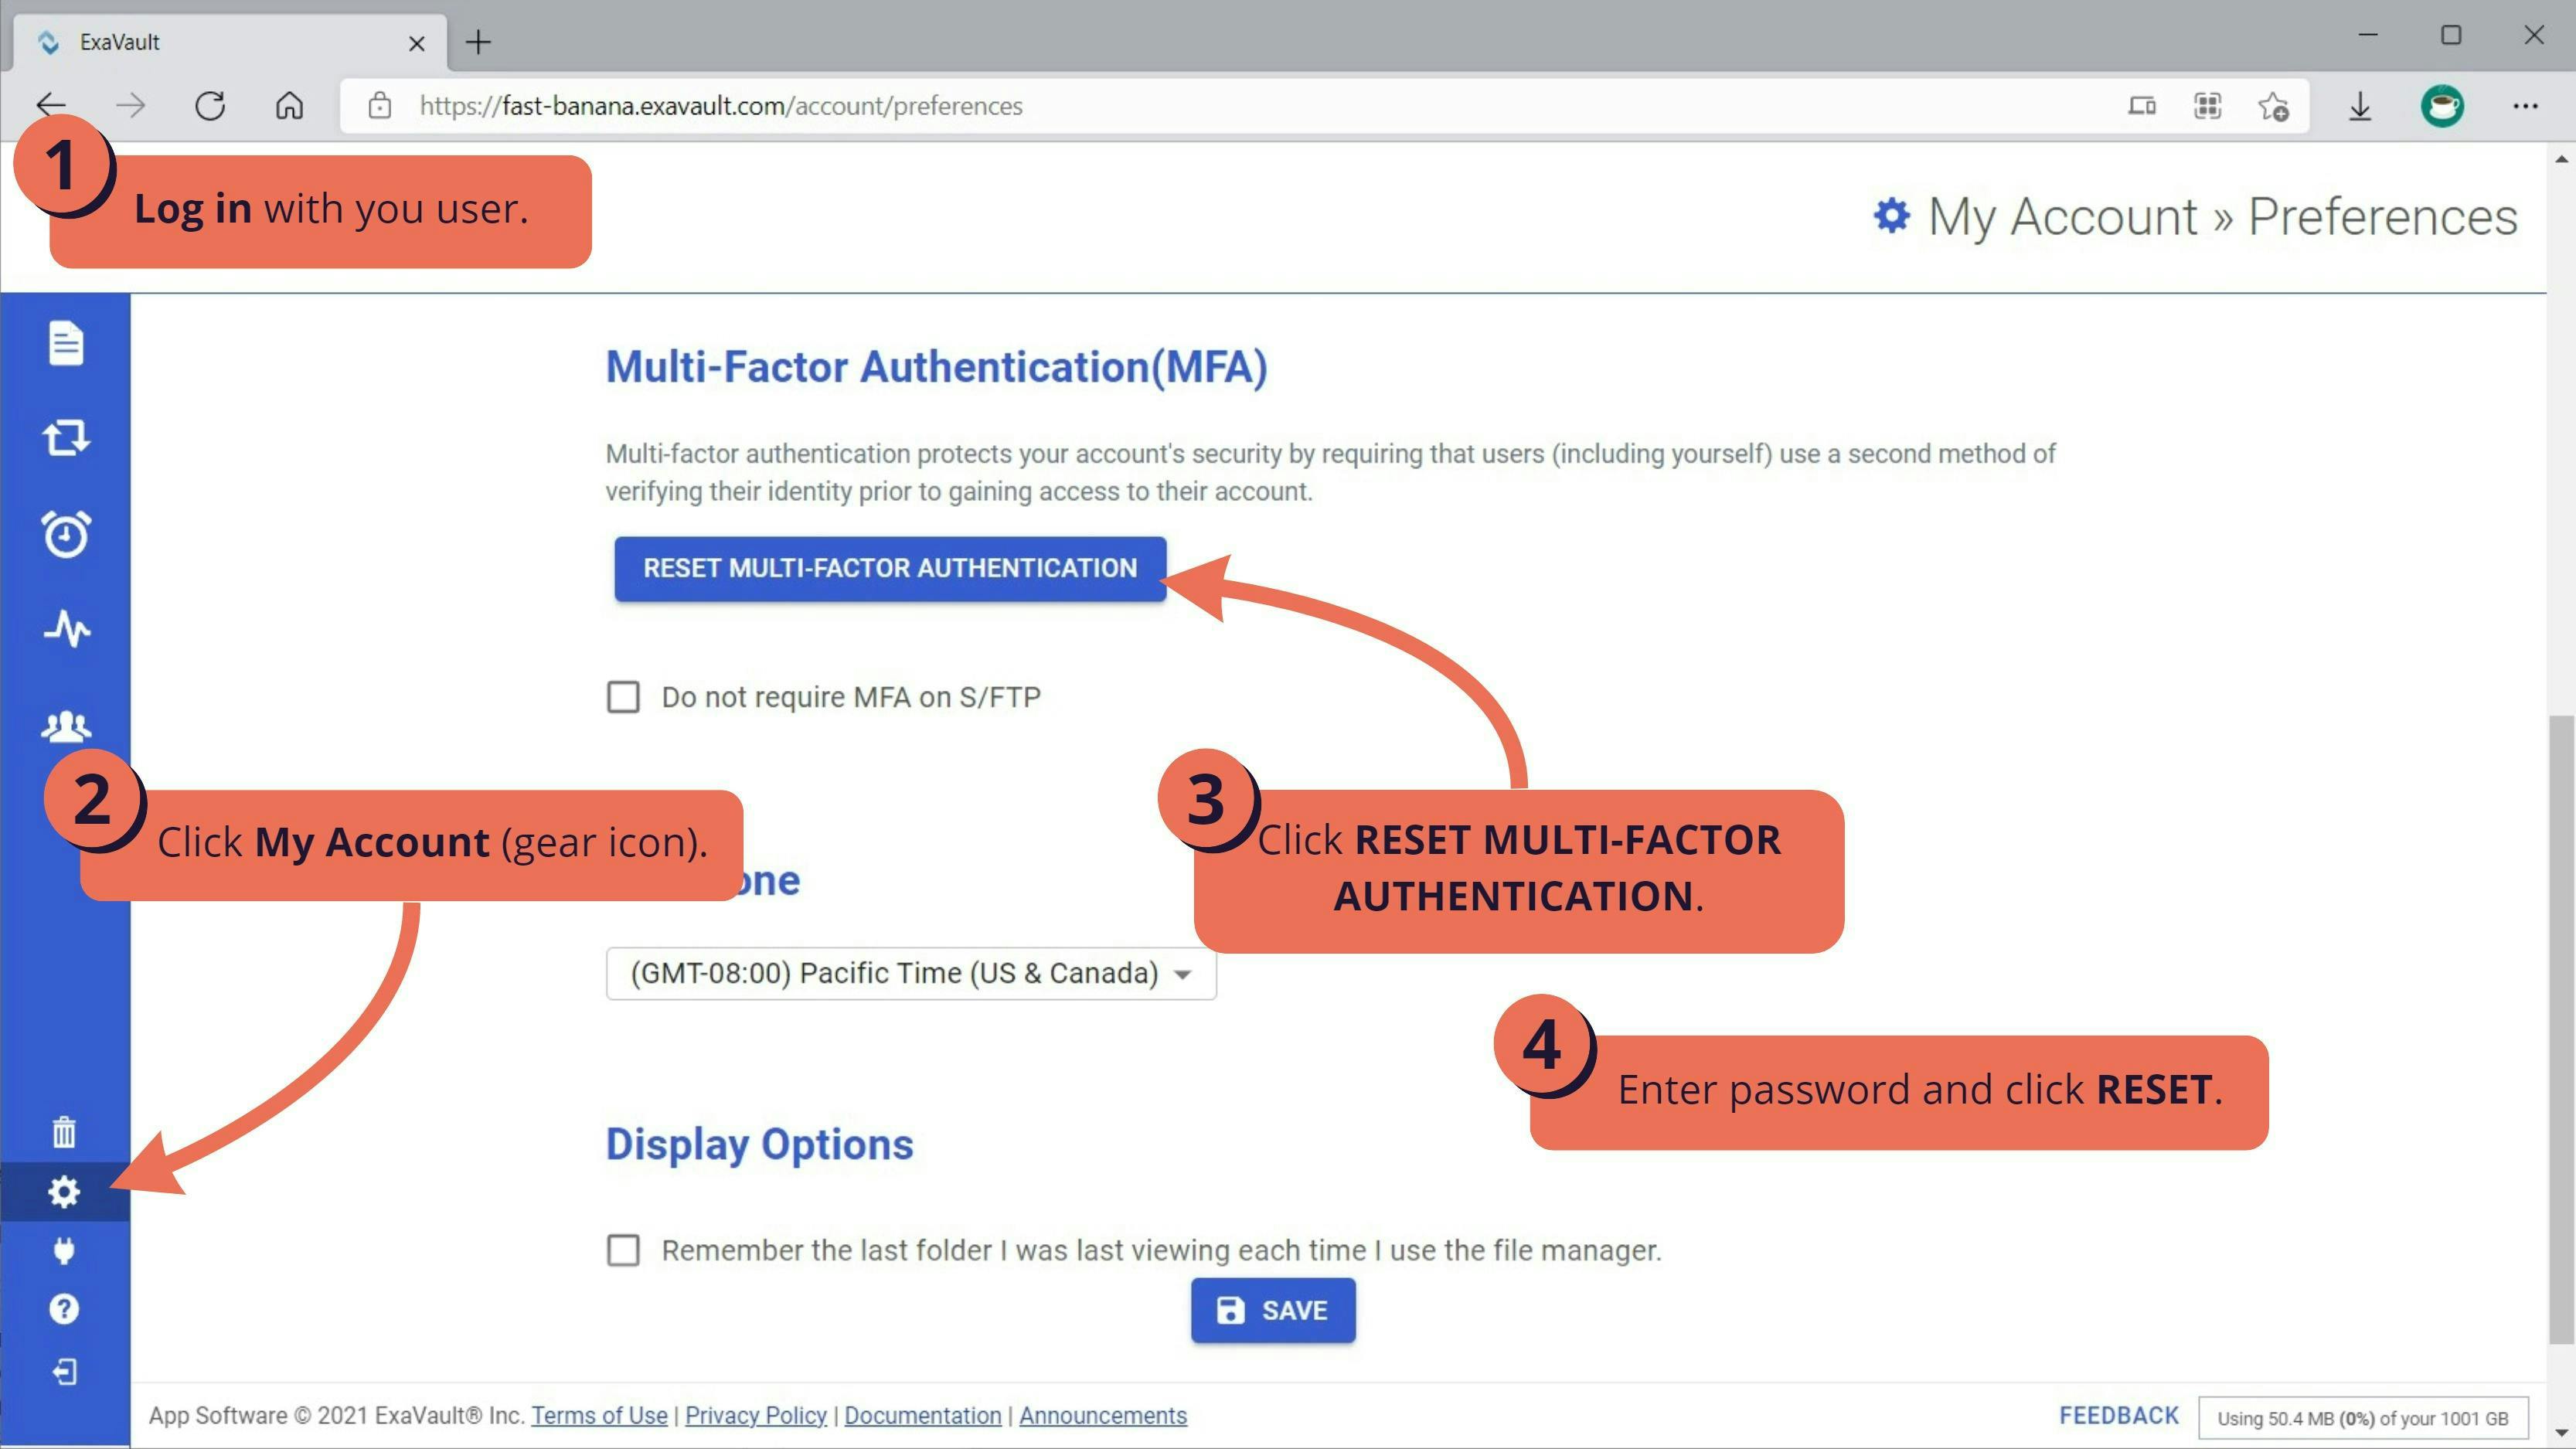
If you need to disable Multi-Factor Authentication or update your authentication type, you can reset from the User settings page:
1. Log in with your user.
2. Click the My Account (gear icon) on the left navigation bar.
3. On the User page, scroll down to Multi-Factor Authentication(MFA) and click the RESET MULTIFACTOR AUTHENTICATION button.
4. Enter your user password and click RESET to disable.
Additional Display Options
The additional display options are available to modify the view in the web application for the viewing the settings on this page.
Timezone
Updating this setting will change the timestamps in the web application to reflect the selected time zone. The timestamps can be seen while viewing the Sessions Log (if an admin user) or when reviewing the information for files and folders. Click SAVE once the time zone is selected to update your timestamps.
Display Options
Select the Remember the last folder... option and click SAVE if you want to return to the last folder you visited when connecting with the web application.
Table Of Contents
Support Library
Still Have Questions?
Email Us
Don't see the answer you need? Drop us a note, and our support team will email you back.
Send Email


